How Fit is Fit? Exploring the Notion that Fit is Fast…
When it comes to fitness, I’ve always struggled with Ricky Bobby Syndrome to one extent or another: If yer not first, yer last.
Now, I’m fast but when I look at me up against those who race bikes, for fun, I’m not all that good, nor do I want to put in the work it takes to get that fast. In fact, I have no desire to work that hard, it’s not even fun after an hour or two.
And therein lies the rub.
I’m not fit enough to roll with the racers but for 15 or 20 miles (depending on conditions) but I’m more than fit enough to be a contributing member for the guys I do ride with. The question becomes, is that fit, or am I just phoning it in, just at a level vastly higher that the average American?
When it’s all said and done, I do this to myself every spring. I get all existential with how far I’ll be willing to go to get or stay fast and I question where I’m at. After a while I get to feeling a little guilty about how much I expect of my daughters and how hardheaded I am on this blog… After all, if I have second (third and fourth thoughts), how can I expect anything out of someone else?
Then the weather will break (actually in about a week, according to the weather channel). The sun will finally come out from hibernation, it’ll warm up and all of this stupid thinking will come to an end and I’ll just get it done.
That won’t change the overall gist of my consternation though. In the end, I’ve conflated being fast and being fit. Being fit isn’t about how fast I can ride a century or who I can keep up with on Tuesday night. Being fit is about being a good, healthy weight and being active in order to maintain that… Being fast, on the other hand, is beyond just being fit.
Either way, I don’t think there’s any doubt I’m thinking way too much this morning.
Pro Fit Cycling Kit – What You Need to Know
I’ve got everything from a looser fit jersey (two) to a pro fit full kit (two) to a normal fit road cycling kit (three sets). I ride in shorts or bibs, though bibs are vastly more comfortable and enjoyable to wear over a long ride.

Pro fit kit by Bora – Bib Shorts and Jersey
Pro fit kits are not for the faint of heart. My friends, they’re tight-fitting, aerodynamically sound, fast and for the high-end clothing, exceptionally comfortable over a long haul.
The trick is getting the fit right. Typically speaking they run a lot smaller than a normal kit would. My favorite cycling shorts are made by Specialized. I enjoy Specialized jerseys as well, but I also like Pearl Izumi and Cavalo.

Specialized RBX Pro shorts and Pearl Izumi Jersey
There is one incredibly important, simple thing one must know about pro fit kits before ordering online: They run small.
In the photos above, I’m 6’0″ tall and maybe 168-170 pounds In the second photo my Specialized RBX Pro (standard fit) shorts and Pearl Izumi jersey are both medium. In the first photo, the pro fit kit’s bibs and jersey are both large. I also have a second pro fit kit though, same as the first, for early in the season when I’m packing a few more pounds, that has a large pair of bibs and an extra-large jersey. On the other hand, I don’t need special “early season” sizes for the standard cycling kit. Pro fit is that tight, but this is as it’s meant to be.
Now, we were lucky when we purchased out club kit. We were given a full range of sizes to try on before we ordered. This meant we were able to pick the perfect size.

When ordering cycling clothing on line, it is imperative to look for the words “Pro Fit” somewhere in the item’s description. If this appears in the description, a general rule is to order one size larger than I normally would but I still check out the sizing chart to make certain I’m only looking one size.
As far as I’m concerned, for jerseys, too loose is just as bad as too tight. Bibs and shorts must be right, period. I’ve seen plenty of old-timers riding around in baggy cycling shorts and it drives me nuts. First, loose chafes. Second, well it’s off-putting when it comes to how it looks. If I’m going to spend the kind of money good cycling kit costs, it’s going to fit right – none of those jerseys that droop down over my ass when I stuff the pockets and no cycling shorts that don’t fit tightly around my legs.
The best way I know to avoid sizing problems when ordering online is not only to know my American sizing but my European sizes as well. In fact, if I’m offered both, I always go with the European sizing for jerseys. European sizing is superior as far as I’m concerned. It’s easier to get a perfect fit.
Just my two cents. Everyone wants to ride their best. I like looking good while I’m doing that. As the saying goes, “If the $#!+ fits, wear it”… You can’t look your best if it don’t.
Specialized RBX Comp Jersey/RBX Pro Shorts

Cavalo Pro Fit Jersey
Crossing 500 Miles for February…
I was sitting at 495 miles for the month of February earlier this morning. Yesterday that was just under 485. A day after we got a foot of snow my wife and I defied logic and took our mountain bikes out for a spin. I crossed 500 miles earlier today, when my buddy Mike and I hit the road for another spin on the mountain bikes. It was an easy, if windy ride and we were just looking to spin the legs and have a fun time of it. The season hasn’t even started yet and I’m already several hundred miles up on last year’s mileage. I’m more than 170 miles over last February and I thought last year’s February was an awesome start…
We’re supposed to be getting quite the warming trend between today and tomorrow as well. While today was always going to be mountain bikes, I have a funny feeling we’ll be breaking out the road bikes for tomorrow’s adventure which, if things work, should have me looking at somewhere around 550-ish miles for the month.
I really dig looking at stats like that, year over year. My first year, other than some running miles, was a big, fat goose egg for the month of February. Heck, I didn’t even hit that for July that year…
Back then, a ten mile ride on my mountain bike was still a big deal. Today, ten miles is enough to make me mad that I don’t have the time to do ten more.
Back then I wouldn’t ride if it was below 50 degrees (F). It was 24 this morning. With a 20 mph wind. And it didn’t suck. It wasn’t easy but it sure beat that stationary torture device known as a trainer.
Back then I was riding a bike to make running more fun. Now, cycling is the fun. At least it’s as much fun as I can have with clothes on.
I went out with my wife yesterday at lunch time, again, on the mountain bikes. Nothing much, just a ride up to the shop and back. We wheeled our bikes in and said hi to everyone and the owner, seeing us in our gear, laughed and said we were nuts.
He’s right too, but today that’s a good thing. I think.
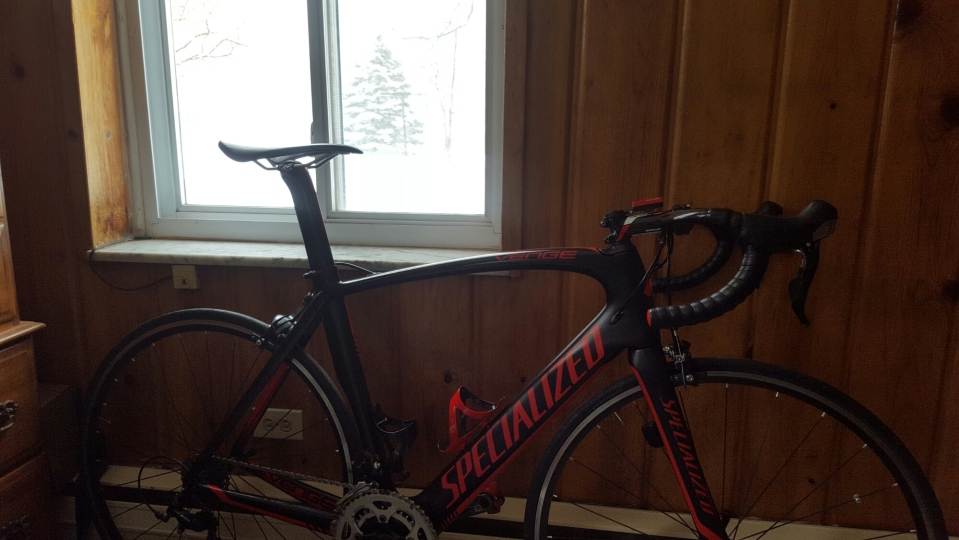
Specialized Venge Comp/Elite Review; Seven Thousand Miles Later…
This is my Venge the day I bought it and brought it home:

And after the new wheels (and lowering the bar/stem 15 mm and setting the saddle back about 5 mm):
Please let me get a few simple things out of the way quickly:
1. If you heard the Venge is too stiff, you heard wrong. The Comp/Elite is not too stiff. It’s indeed a stiff bike, it’s supposed to be, but the 10R carbon composite frames are nowhere near too stiff. I can’t comment on the S-Works 11R frames because I don’t have eight grand to blow on a bike. I do have 7,000 miles on my Comp (the Elite for the last two years) and I am nothing but happy with the ride. It’s got the right amount of go where you need it and the right amount of compliance where it counts.
2. The original wheels on the Comp sucked, I replaced them almost immediately (see photo above). The wheels on the Elites are a step in the right direction though, however the newer Fulcrum S-Series wheels are one step lower than the Fulcrum race wheels. The S-5 is comparable to the Race 7. The S-3 is comparable to the Race 5 (at least that is how it was explained to me by someone who spoke to Specialized).
3. A major upgrade in the Elites (2015) over the Comps (2013), the newer models come with the S-Works Aerofly handlebar. I had to upgrade mine to that bar (and oh, was it worth it). The stem was a bit of an afterthought. I didn’t need to upgrade it, it just looked cool.

For starters, my Venge is a 56 cm frame. I’m 6′ tall and would typically take a 58 but I wanted a bigger drop from the saddle to the handlebar so I could ride lower.
After somewhere between 5,000 and 6,000 miles on my Venge and having to send the right side of the crankshaft back because of a fit/play issue, a new chain and two sets of tires, other than the one side problem FSA Gossamer crank I haven’t got a complaint. In fact, I figured I may as well go crazy:

No more worries about the crank, and I dropped three-quarters of a pound. The S-Works crank, again, was worth every penny. In fact, of all of the upgrades on my bike, I’m happiest with the crank.
The Comp (and now the Elite) comes with Shimano 105 components which, while heavy compared to Ultegra or Dura-Ace, are incredibly easy to dial in and have maintained their tune so well that I haven’t had to tinker with the cable adjusters in at least a year. The front dérailleur was a little touchy at first though never so bad that I couldn’t shift – it just took a bit of tinkering to get perfect.
Then there’s the frame. After more than 7000 miles, it’s still solid as the day I brought it home. I’ve had the bike over 56 mph (90 km/h) without as much as a wiggle, let alone a speed wobble. Meanwhile, the bike is exceptionally decent on imperfect roads. Much more reasonable than my 5200 – really, it’s not even close, especially once the S-Works handlebar was installed.
Now, in all fairness, when we went through the whole crank click problem, the whole bike was pretty much rebuilt from the ground up to make sure it wasn’t an easier to fix problem. All of the bearings were checked to make sure they weren’t lose or defective and then, just to make sure, were seated with Loctite. Beyond that, I take everything, except the internally routed cables, apart to clean and lube the bike. The crank is done twice a year, the steering assembly is done at least twice a season, the chain is lubed every 300 miles (I like a quiet chain), the dérailleurs are cleaned and dry-lubed with the chain and the wheels cleaned every week. In other words, I really go out of my way to care for the bike.
I enjoy it so I want it to last as long as it possibly can.
Here’s the bike as it is today (though I’m looking at new wheels for it):
I’ve removed the decals from the wheels because I busted the rear wheel on a pothole on a four day tour. The company wouldn’t sell me just one hoop so I went with a Velocity rim and laced the hub and spokes onto that hoop. I’d rather have the decals on the wheels, but I wasn’t about to buy two new wheels for a hoop (the only option I was given). Those are Blackburn carbon fiber bottle cages. The stem is an FSA carbon wrapped aluminum (only 110 grams – the carbon wrapped aluminum is lighter than a full carbon stem because it doesn’t have to be overbuilt for the stress). The handlebar is S-Works Aerofly and the computer is a simple $40 Specialized wireless Speedzone Sport. The crank is S-Works carbon fiber and the pedals are red Keo Classics. Everything else is stock, though I’ve had to put a new cassette on it and its on the third chain.
My Specialized Venge, without a doubt or regret, was worth every penny of the $5,000 I have into it. I’ve ridden it everywhere, from the mountains in Georgia and northern Michigan (lower peninsula) to the flats of southeastern Michigan. It climbs fine, it rolls fast and is plenty comfortable for anything from a jaunt around the block to a multi-day, century a day, tour.
If you’re looking at one, I can’t recommend it highly enough. It’s one blazing fast bike… and if you’re looking at a newer Elite, the Aerofly handlebar comes standard and the bike is $300 cheaper that what I paid for mine (and I had to cough up another $300 for the bar upgrade).
Finally, I’ve had my Venge a little over two years but only have a little more than 7,000 miles on it because it only gets the good weather. I won’t ride it in the rain or until all of the salt from the winter has been washed off the road by rain… If I had my choice, I’d own two. One Venge Pro for the good weather and the Comp for bad… That’s a little more cheddar than I can throw on a couple of bikes.

A Two Minute Bike Maintenance Item that can Save You Untold Hassle and Cash…
With spring coming up, I have a simple two minute (maybe less, I had to take photos too) maintenance tip that can save you from a HUGE hassle…
When we ride, what must we do, besides inflating the tires, every single ride?
We drink. Whether it be water, some hydration mix or even Gatorade, we consume a lot of fluids.
Why?
We sweat a lot.
Right?
Okay, where does that sweat go? Throw in some water and Gatorade and you get a pretty gnarly mix that trickles down over much of the bike. One of the least looked after items on a bike are the bottle cage bolts and they take a tremendous amount of abuse, when you think about it. If you recall, when I took my Trek in to get painted, after I stripped the entire bike down, there was still a bottle cage attached to the frame.

Those bolts are so fused to the bolt bosses that I didn’t want to risk breaking the bolt off or stripping the bolt head… I had to let the pros handle it. Well, that only has to happen once to me, because that kind of stuff can get expensive in a hurry.
This is what you’ll need… Oh, and a paper towel too:

Break the bolts free, turning counterclockwise:

Clean off the bosses:

To lube the bolt threads, just stick the bolt in the nozzle and give the tube a little squeeze. “Little” is the operative word there:

Install the bolts and look at that!:

If you’re lucky, as I was, your once plastic bottle cage will turn into a color-matched Blackburn carbon fiber beauty! Gotta love it when the bike thanks you for taking care of it like that.
Next, tackle the second cage. For this one I just did one bolt at a time (it’s a newer cage and the bike hasn’t seen one rain drop since that cage went on – I know it’s clean underneath):

Next, we put a dab of lube on our fingertip:

And lube the bolt head. I do this because those rivulets of sweat, Gatorade and Perpetuem can turn into a pretty gnarly funk. In fact, you’ll find, as I did, that those bolts are magic Funky Fluid Magnets:

Then take that paper towel and dab off the excess lube. We do this because we don’t want those Funky Fluid Magnets to attract dirt and dust as well:

And there you have it… Bob’s your uncle:

PS. That’s our Snopocalypse right outside the window there. We’re supposed to get got a foot today. WOOHOO!
Ten Sure-fire Tells that You’re a Road Cycling Noob…
This post is going to be controversial and I’ve got ten chances to piss you off in the next few minutes. This is not my intention. Nor is it my intention to suggest that any seasoned cyclist change their ways to suit “society”, me, or some set of rules. Heavens to Murgatroid, I’d never suggest that! I know I’m looking at some pretty ugly odds… In fact, some people are simply so set in their ways, they actually make flouting these suggestions cool. It also helps if you’re fast enough to hammer everyone else in the group who would give you $#!+. Just sayin’. So be you and be proud… Please, just give this a read and some consideration.
The intent of this post is quite simple: I made most of these mistakes early on, so I know what I’m talking about here, and I’m trying to pass on my experience that it might help you, oh friendly cyclist, not make the same mistakes. I had to read a lot of posts like this one so I could learn how to fit in… While the main goal is always “just ride”, we all want to look cool when we do, lest we end up with a photo on the internet of us cruising down the road, head high, with our helmet on backwards. I’m simply trying to help people find the short path to feeling awesome about themselves on their bike, rather than going the hard, long way like I did. In the end, if you just do the stuff listed below, it’s going to be cheaper for you in the long run. Trust me.
- The plastic spoke protector immediately behind your cassette is still on the bike after you bought it. This is the surest sign of a noob. That plastic disc behind the cassette gets dirty, can’t be easily cleaned and is virtually useless if you know how to maintain your bike. My bike cannot over-shift the cassette into the spokes because I have the rear derailleur set up properly. That little plastic do-dad needs to come off. Immediately if not sooner.

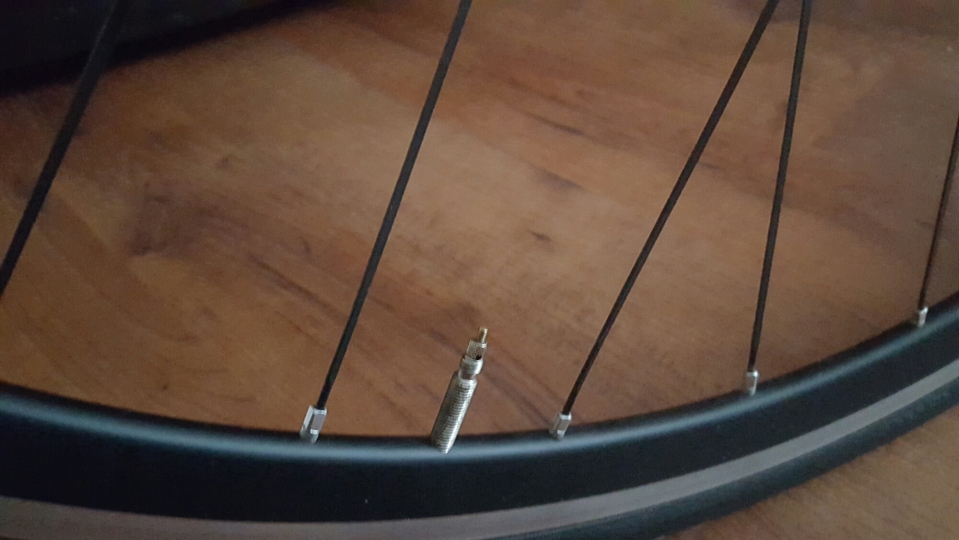
- The lock nut and plastic cap for your presta valves. There actually is an installation use for the little threaded, knurled lock nut that comes with every new inner tube. In deeper sectioned rims, it can be used to hold the valve stem up until there’s enough pressure in the tube that the stem will stay where it’s supposed to. Of course, this also means you bought the wrong length stem if you need the nut. So you’re hit that way too… The plastic cap is only there for shipping and storage. Open up a new tube. See how the tube wraps around the stem? Well that little threaded part you loosen to add air to the tire will wear a hole in the tube over time if it isn’t capped. Once the tire is installed, the cap is utterly useless and will serve no purpose. Take it off. Seriously. The fact that you think it’s of use and therefore should be on the stem, just because it was in the box, says a lot about you to every new person you’ll meet.
- Reflectors. Now, far be it from me to suggest anything illegal or dangerous, but if you have cycling shoes and wear cycling clothing, everything has reflective elements on it. Also, if we’re riding in the dark, we have these awesome new, rechargeable lights that work a hell of a lot better that reflectors. Lights are cool. Reflectors, not so much. I opt for the reflective surfaces on my clothing and shoes and bright, awesome, rechargeable lights. You do what you prefer here, but if you’re not riding in the dark, why would you need a reflector in the first place?

- Underwear beneath the cycling shorts. Thank God, I’ve never actually done this… I did, however, see a guy at one of our club rides with his tighty-whities sticking out of his cycling shorts and over his cotton tee-shirt. Dude must have chafed nine ways to Sunday on that club ride. Don’t be that guy. I have no advice for women on this topic. Sometimes ya gotta do what ya gotta do. I get it. Some things in life just ain’t fair. UPDATE: a commenter who goes by Zebedee mentioned that he did indeed wear underwear underneath his shorts for an added layer of protection between his cheap shorts and his nether regions. This is understandable, though I recommend compression shorts, they work better (and they’re not cotton). Cheap shorts are the bane of distance cycling. They are the cause for some pretty drastic measures.
- Too many spacers above the stem. I went for a year with too many spacers above my stem because I wanted to lower the bar as I grew more comfortable with an aggressive position on the bike… It’s what they call “slam the stem”. I ended up leaving 15 mm worth of spacers on top of the stem until I was certain I had the bar where I wanted it, then I had it properly cut down. Now, some purists will say that you shouldn’t have any spacers above the stem. While I understand the desire for cleanliness of lines, having a little bit of material above a full carbon fiber fork is advisable so pressure is equally distributed when you clamp down the stem. I go with mechanic recommendations here.

5 mm above, 5 mm below… Perfect.
- Wearing your helmet too high on your head – too much forehead. From the bridge of your nose, place your pointing finger and middle finger together. Set your middle finger on the bridge of your nose… Your helmet should touch your pointer finger. Any higher than that and you’re showing too much forehead. Nothing says noob like too much forehead.
- Mountain bike pedals on your road bike. I did this one too. I had one pair of shoes and I couldn’t afford a second. Once I could, I went to road pedals and shoes for the road bike and mountain on the mountain bike. Road shoes and pedals make enough of a difference that they matter. In all fairness, this one’s a little nitpicky and can easily be gotten away with by pulling the last ten miles in a century for the group. I pulled for 17 of 20 miles on one of the hottest centuries we’ve ever done as a group and nobody ever gave me guff for my shortcomings. Busting your ass for the good of the group is endearing that way.

- Wire/metal water bottle cages. Just don’t do it. They won’t hold your water bottles as good as the plastic or carbon fiber one’s will… Aluminum tends to be a little bit bendy and if you hit a decent bump, your bottles will eventually go flying. Now, they don’t have to be the carbon fiber beauties you see on my bike, the plastic one’s work just great. I’d skip the wire one’s on the road bike though. UPDATE: The Tempo Cyclist commented that titanium cages on a titanium frame should be an exception to the rule. I agree. I should have clarified “aluminum”, “alloy” and “stainless steel” in this one – though one could argue for naked stainless on a stainless frame too. Titanium cages are just as light and strong as carbon fiber. Oh, they’re just as expensive too, so be aware…

- Wearing dull/drab colors. Bright colors are cool. Reds, bright blues, oranges, greens and even hi-viz yellow… We want to be seen. Period, end of lecture.
- A dirty/squeaky drivetrain or bike. A dirty drivetrain is another sure sign you’re a noob. Once you realize how expensive that stuff is to replace, and how quickly dirt and grime degrade everything, anyone who puts decent miles and cares for their bike will have a fairly clean drivetrain. Bikes are cool. Clean, well kempt, awesome bikes are cooler.

BONUS LAP: The Fat, Bearded and Tattooed Cyclist came in with this one: Having the saddle slammed all the way to the top tube because the bike is too big. Truer words have never been written. If your saddle is much lower than this:

Your bike is too small.
One of the Most Important Tips Every Newcomer to Cycling Needs to Know About Getting Fast…
For those who are deciding to make cycling their New Year’s resolution, many will be tempted to hammer the gears hard right out of the gate, only to find out that it’s a lot more work than remembered as a kid. Well, that’s what happened to me anyway, and I figure I’m not the only one.
First, don’t be disheartened. If you put a little bit of “want to” into it, you’ll progress rapidly, adding distance while keeping your speed up. We get out of it what we put into it, but be careful that your goals are in line with reality (weight and age). When I started cycling I didn’t know what to expect. I found out soon enough that 4 miles in 16 minutes on a mountain bike was pretty hard. Within a month I could hold that for ten miles… A year and a couple of road bikes later and I could hold 20+ mph (3 minute miles) for 30 miles on my own, and I was riding almost every day of the week….
However, my legs still took a while to build up. Estimates, depending on age, are two to five years before a cyclist can really start to realize their full potential but the common marker is “cycling legs in three years”. This won’t mean that you can’t realize gains quicker, you will if you work for it, over time your legs become much more resilient to the rigors of daily cycling so that putting together several hard days in a row won’t have you looking to curl up on the couch with a bottle of Aleve and the remote control for a few days to recover.
I’m working on my fifth year now, and last year was a breakthrough for me. I much stronger through my third year, but last year was special. I was pretty fast once I got into road bikes (let’s say a lot faster than average, but not all that fast next to those who race for fun). I increased my mileage year-over-year by 20% and was able to push out three months where I only missed two days on two wheels. Prior years, the best I could hope for was a couple of weeks in a row before I needed a day off… One day off a week was even better. This ability to ride on a daily basis, I ascribe to finally getting my cycling legs.
Cycling with speed is a very simple equation (i + d) w = a:
(Intensity + Distance) Want to = Awesome.
Oh, and one of these won’t hurt:
Road Cycling: The Ideal Placement for a Thunderbolt Taillight in a Group Setting
The topic of the proper placement of a taillight can be a bit of a charged topic, believe it or not, in a group setting.
First of all, an avid enthusiast roadie (such as me, not to put too fine a point on it) knows the best way to be visible is not just to wear a bunch of neon green or yellow stuff (no offense, Tinkoff) when you’re on your bike. Now, after seeing a guy, barely seeing I should say, riding in a forest green jacket, possibly the worst color to wear on a bike, one must know the trick is to be loud and proud. Err… Anyway, bright red works great. Bright orange too… Yellows, even some of the blues – and white is a sure winner. Brown, gray, black (how I wish this weren’t so! I love black!), dark green… these are all bad. The additional trick, however, to really sticking out, is to look awesome. The more impressive one looks on a bike, the more you stick out. If you doubt me, you’d better check your awesome.
There are those times, however, where you just wanna wear black. For these days, I like to fly a light, just to make sure I give myself the best chance to pull into the driveway with the rubber the right side down. Also, while I absolutely will not ride in pea soup-thick fog, I will ride in less than perfectly clear conditions… For those days I want the brightest light I can get and the Serfas Thunderbolt is it.
My friends and I all use a Serfas Thunderbolt taillight. All of us. Rather than drone on about how bright it is, I’ll simply say this, a police officer once pulled over a friend of mine on his bike to compliment him on his choice of lights because the officer could “literally see [him] a mile away”. He had it on “low blink”.
It’s a bright frickin’ light.
Anyway, the normal placement for a taillight is either on the seat post or on the saddlebag, right?
Not if you use a Thunderbolt, you’ll blind the $#!+ out of anyone riding behind you.
This is the proper place for it in a group setting:

On the left seat stay, just above the dropout.
See, the norm for a group ride is not to look at the wheel but over the shoulder of the person in front of you and up the road, with maybe a glance down every now and again to make sure your wheel spacing is right… With a Thunderbolt on the seat post, even though it’ll be pointing down a little bit, it can be distracting at best, blinding in the worst cases.
Now, because you’ll be checking the wheel in front of you from time to time, the seat stay placement might seem worse, because it will shine up into one’s face, but it’s not. We all ride with our light there and we never have problems.
So please, think of the person on your wheel. Don’t blind them, dude.
If you like using a light, I would like to recommend the Thunderbolt. In my opinion, it’s the best bicycle taillight on the market, by a long shot. I bought mine, minus my club discount at the local bike shop, and Serfas has no idea that I’m giving their light a review.
Ride hard, my friends. Or ride your approximation of hard. That works too. Just ride.
UPDATE: My brother from another cycling mother, Titanium Henry chimed in down in the comments section to suggest going with the full-time on position rather than the blink to avoid blasting your brothers and sisters in chain rings with a strobe light show…
BULL $#!+…
Until last night, I really didn’t have much to write about… After 23 days in a row on the bike I simply felt like taking a day off. I spent the afternoon watching my daughter kick some butt at her swim/dive meet (see below – the second photo is of her overtaking one of her teammates in a 400 relay, when she dove into the pool she was better than a half-lap down).
My poor wife has been searching for a game the family could rally around playing, God, ever since my youngest was old enough to play games…. Clue, Five Crowns (an AWESOME game btw), and a few others that didn’t stick all. Even cribbage.
Our daughters learned how to play bull$#!+ at swim meets and we decided to give it a go at home. Of course, the girls call it BS…
And this became our game.
We have laughed so hard I’ve blown coffee out of my nose onto the table. My wife, water and Gatorade. Last night devolved to a new low, or maybe that should be risen to a new high…
Broccoli.


When we were trying to figure out a game we could all play and enjoy, it was often boring. Now that we’ve got something that makes us laugh and can all enjoy… well you can see the evidence on the table.
Please, do me a favor; Don’t rush to comment section to complain about morality. My wife and I will raise our kids as we see fit. At least for now, it’s still a free country… Trust me, we know what we’re doing. 😉


Happy with the Effort, not the Result. Well, kind of.
I rode early, with my buds, on Saturday, so with District swim meets over the weekend, that meant I was with my youngest when everyone rode yesterday morning so my wife could ride with the group… This meant I was on my own after the morning session, once Mrs. Bgddy showed up with the eldest just after noon….
I was looking forward to the ride until I was halfway home. I knew I was going to have two hours, leaving enough time for a tire change and then another hour for something unforeseen, so I wouldn’t have to ride in the dark….
The tough part was the wind. It was out of the northeast which really sucks for me. Flint is northeast of my house and the traffic is a little too silly that way, so on a solo ride I’m avoiding that direction… That left southeast, southwest or northwest routes. In other words, I was going to have a lot of wind to cope with no matter which way I went. I chose northwest because, well, it seemed like the lesser of the evils. At least I’d have a few miles towards the end with some tailwind.
I started out great, with a headwind for the first mile, just trying to get the legs up and spinning. I’d decided on a route that should have come out to about 32 miles and I figured if I took two hours to do it, I’d be happy. I rationalized, I’d had a great few weeks with some really hard miles, including a great ride on Saturday, so if I took my time once, hey, it’d be cool.
Well, if you’ve been following this blog for any length of time you know I don’t do slow well. For some reason that I’ve yet to figure out, once I get clipped in I just can’t help myself but push it. This is, in part, due to a lack of experience doing long solo miles…
I started out into the headwind (10-12 mph) at about 18 mph for the first mile and when I turned west, with the NNE wind (i.e. a little help, very little), I cranked it up to 20-22. Then came four miles north into the wind again and I tried to tamp down on the enthusiasm and keep it between 17 & 18. I don’t have a computer on my Trek, all I have to go on is the gear I’m in and the feel of my cadence, but over the years I’ve become quite adept at knowing how fast I’m going… Those four miles got a little grueling after a bit and I was wishing for a friend to hide behind for a minute.
Next up came a turn heading west for five miles. I was hoping for a little bit of help from that east wind but it was all but imperceptible, if there was any. It mostly felt like a crosswind but it was a lot better than the headwind I’d just battled. When I pulled into Lennon, the meeting spot for our club ride, my plan had been to do our warmup loop and head home but my enthusiasm was waning. Yes, that’s a good way to put it. I was so tempted to turn around and call it good at 25 miles… I don’t know if you can relate, you get to that point where you know you’ve exerted yourself just a little too much on the way out and you know that last five miles is going to be brutal if you keep heading out. That’s where I was.
I thought to myself, “You sissy… You’re going to do this whole ride and you’re going to finish strong, so just get on with it.” And I did, though “strong” is too strong a word. The miles I spent heading back south were nice but I was struggling just to get to 20 mph.
After stopping to take a few photos, I ended up pulling into the driveway with just under a 17 mph average… So, in other words, I ended up almost a mile an hour faster than I’d planned on, a full ten minutes faster, but I still was a little disappointed. I suppose it’s simply that I struggled a little more than that result should have been worth, even if I had a lousy wind that bucked me most of the way.
Oh well, that’s me.

UPDATE: After telling my wife about my struggles, she let on that everybody struggled on the club ride… It wasn’t just me.
