In my first post on what will probably turn into a fairly extensive series over time, dealt with the overall joy that becomes constantly tweaking a road bike to make it fit right. Some bikes are simple – you take it to your local shop, get it fit and its perfect. That’s how it went with my Venge. With my Spring/Fall/Rain bike, a 1999 Trek 5200 T, I’ve not been so lucky. I’ve been tweaking on that thing every now and again for three years and I’ve finally got it to where I can be happy.
Easily, one of the most confounding issues I’ve had has been with my hoods. My bike was purchased used from my local bike shop and I don’t know if the fella who had it before me had one arm shorter than the other but they were off by as much as a quarter of an inch. My problem was that I did a lot of over thinking – that the problem must have been me, because who would be dumb enough to install their hoods crooked. Then I thought I’d just leave it because I wasn’t experiencing any pain with them the way they were and I followed that up with how stupid I was for not addressing the issue. Folks, that’s way too much thinkin’ going on there. At the time I knew nothing about hoods or how they attached to the bike or how easy it would be to adjust them – I thought it would be a big deal, possibly re-wrapping the handlebar. I was out of my league in other words, so I took it to the bike shop. Aligning them properly took all of two minutes. I didn’t even have to pay for the adjustment.
In any event, aligning the brake hoods properly when the bar tape is off is quite simple – there are lines on the front edge of the drop that help you line everything up. With the tape on, it might seem like it would be trickier but you would be mistaken. All you need is the proper Allen wrench (almost always a 5 mm) and a straight edge – a yard stick or four-foot level work fine (though the size of a yard stick makes it a little easier to see).
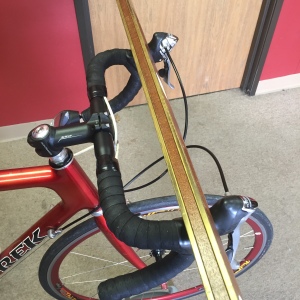
To check, place your straight edge on the hoods (and please note – I use a 4′ level but I am not using it for the level, just the straight edge:

Now rather than bother with checking the level of the bike, simply go to the front of the bike, kneel down and look at the gap between the bar and the straight edge. It should be an even gap on both sides of the stem:

Be careful not to put too much stock into the gap at the bar tape as there will be minor variations – you just want to make sure that the gap is even at the bar. If yours is not, I’ll get into how to fix it in just a second.
Next, we’ve got to check the angle that the hoods come off the bar at:

Here’s another angle:

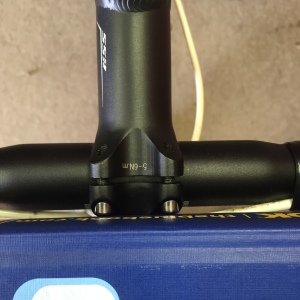
You can see that mine are squared up pretty good but short of relying on sight, I still don’t know the “right” way to make sure that the hoods are coming off the bar square but if used properly, a simple book should be able to get you close – just use a hard cover and make sure you’re squared up on the stem screws:


As you can see in the two photos above, I like my hoods toed in a little bit, but this is only so on the Trek… For some reason the Ultegra hoods, maybe because they’re smaller, feel just a little bit better when they’re toed in just a hair. Either way, you see they’re identical (any irregularities are simply due to camera angle).
So, now that we can reliably check how our hoods are lined up, we can move on to fixing them if one is off… Now each brand, and even each line within a brand, will be slightly different but for the most part, you should be able to access the tightening bolt without removing the hood. For my Trek, there’s a little groove in the plastic… All I have to do is pull back the hood and follow that groove with my 5 mm Allen wrench and I’ll bump into the bolt:


Simply loosen that bolt (not so loose that it flops around in there, just loose enough that you can move the hood with a little coaxing back and forth – keeping in mind that too much coaxing of a hood that isn’t loosened enough will scratch the bar… This would weaken it, especially for a composite bar. Use your melon and be careful). Wiggle the hood into position where you want it and then snug it back up. Keep in mind, tightening the hoods up is a delicate process. If you don’t tighten the hood enough, it’ll move around on you while you’re trying to climb a hill. That would suck. Conversely, tighten it too much and you can damage your handlebars. Best to consult your owner’s manual and use a torque wrench for that final dialing in of the bolt (I don’t, but I won’t sue me if I screw up, so for the purposes of this post, I recommend that you consult your bike’s owner’s manual and use a torque wrench).
Again, each shifter brand will be different… For some, if you pull the brake lever and look directly down at the top of the hood, the bolt will be between the lever and the hood:

If yours is in there, loosen your brake cable by twisting the lever that you use when removing a wheel so it’s easier to depress the brake lever enough to get at the bolt.
So that’s pretty much “how”, now for the why. I found that as I increased my mileage on the Trek, I had one arm that always hurt just a little bit after a ride (at the shoulder, radiating up to the back of my neck). Once I was putting in anywhere from a three to five-hour ride on a weekend day, the pain became quite bad – and that’s when it hit me… The arm that hurt was the one that didn’t have as far to reach. I was putting a lot more pressure on that side so my shoulder and neck began hurting as a result of the longer rides. As the distance I’ve been able to ride has increased, I’ve noticed that my bike has to be more precisely set up or something will hurt. In other words, if I’m only riding an hour a day, I can get away with my bike not being quite so meticulously balanced. Conversely, if I want to ride a hundred miles at a pop in relative comfort, well I have to make sure to take the time to balance the bike well.
Also, and more importantly, if you look at that second photo above, you might have noticed that I have a Specialized bar on my Trek. Not exactly PC but I like the reach and drop of the bar so I don’t care. I changed the bar last fall though… The correct way to set up hoods is to level the handlebar properly and then install the hoods so they follow the line of the handlebar (not like this photo, a little lower):

Decorum dictates that my hoods be a little lower on the bar than where they are now, but that just didn’t feel right – I had to reach just a few millimeters too far… Not far enough to justify a shorter stem, but far enough that I had a tough time feeling comfortable. By raising the hood on the bar, just that little bit, I fixed my reach issue and can now ride comfortably. In short, just like anything else on a bike, millimeters matter. If I’m feeling a little bit uncomfortable, whether it be reaching too far or not enough, the problem must be addressed if I want to enjoy the longer rides (and I very much do).
Do it yourself, when it comes to cycling, can sometimes be tricky. The hoods, as long as you know what you’re doing, is not one of those tricky things. They’re quite simple.
UPDATE: Be sure to check out Fastk9dad’s comment below for an alternate method of aligning the hoods.


[…] The Noob’s Guide to Tweaking a Road Bike to Make It Fit – Part Two: The Hoods. […]
Odd questions: How long are your arms? Right handed or left handed? When you fold your fingers together, which thumb overlaps and lays on top? Chances are, the thumb that lays over the top – That arm may, may be a little bit longer than your other arm. We are talking fractions of an inch here, which is no big deal if you are twiddling your thumbs and kicking cans down the road all day long. Spending X amount of hours riding on a bike is another story. Just something to keep in mind, looking forward to more of these posts.
Left handed, left thumb on top… Interesting point indeed. In my case, it was definitely misaligned hoods though. I have a photo of just how off they were, somewhere, I’ll dig it up after my trainer ride. 😎
This is interesting. I never really thought about it but can see how it could make a difference on long rides. Thanks for the comment.
Here is an alternate method to aligning your hoods if you don’t have a level or a right angle. Roll back the rubber hood and measure from the bottom of the lever to the rear edge of the bar (i.e. curve the tape measure around the bottom of the bar) then duplicate on other side. For me this has always been quicker as I don’t need to set the bike up level etc… I can do this while in a workstand at eye level.
As for hood angle… again I just measure from a point on the lever body to a point on the bar clamp and again duplicate on other side. Where you measure from/to is irrelevant, just use the same points for both sides. This also assumes your bar is properly centered in the clamp.
Nice! Gracias amigo.
[…] Did you know that your hood/break lever is designed to turn askew if the bike falls? They do this so the lever has a minimized chance of being damaged in a fall because many models are expensive. They’re very easy to straighten out. […]